Glass Christmas Trees
December 2, 2011
By Alderberryhill.com
Happy Weekend Everyone!
Christmas crafting is in full swing for everyone by now and I am enjoying the crafting season as well.
I love the color turquoise and am trying to work it into my Christmas decor.
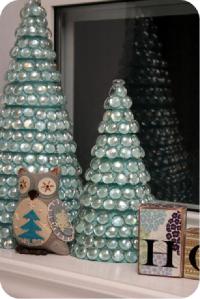
Here is my latest turquoise creation.
Glass Christmas Trees
And here is how I put them together.
What you will need for the project:
-
Styrofoam cones or stack trees.
-
Craft paint
-
Brush
-
Glue gun
-
Glue sticks
-
Glass bowl fillers (the ones that are flat on the bottom).
The process is so simple.
-
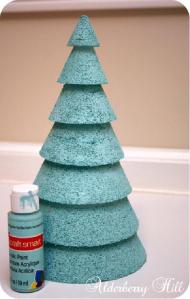
Paint the styrofoam, let dry
-
Glue on the glass
-
I glued the glass on using a brick laying technique. The second row started at the seam of two glass pieces,
not directly above the one below it. Sometimes this is hard to keep up because not all of the glass pieces are the same size.
But just go with it, it will turn out fine. Other than the constant repetition of gluing on the glass, this project is super easy!
Imagine, Improvise & Invent
Creamer Bottle Snowman
Posted on December 20, 2010 by CraftyStaci
I couldn’t let Christmas go by without sharing this tutorial
with you because it has special meaning to me.
This little guy is the project that planted the seed for this blog years ago.
I’m a complete and total coffee addict. Coffee house lattes are my favorite, but when
I’m at home it’s vanilla flavored coffee with vanilla creamer. I kept looking at the creamer bottles
and thinking how easy they would be to make into a snowman. I know there are others out there now,
but at the time I hadn’t seen any. Finally, I saved bottles until I had enough for friends and family.
I came up with a powdered drink recipe and the snowman army was born. After I made them,
I thought it would be nice if I could share how I did it with other crafty people.
And then I let that thought go. Here I am, several years and creamer bottles later,
with a tutorial to show you how they’re made. I feel like I just completed some sort of loop.
You will need:
an empty 32 ounce liquid creamer bottle
5” by 1 1/2” flannel (cotton will work too)
18” by 1 1/2” flannel (again, cotton is ok)
12” by 4” felt
8” by 1 1/2” felt
18” of wire
embellishments (buttons, felt scraps, etc.)embellishing the mittens from a contrasting color of felt.
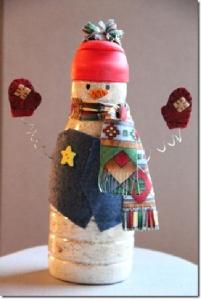
Wrap the vest tightly around the empty creamer bottle.
Glue the edge down to the vest in the front using a hot glue gun.
Using a pencil or pen, mark a dot on each side for the arms. Slide the vest off the top of the bottle.
Using a toothpick, poke a hole on each side at the mark. Feed the end of the wire out each hole,
bending it slightly so it conforms to the back of the vest.
Slide the vest back onto the bottle. Glue the edges down using tacky glue.
Secure with a rubber band until it’s dry. I used hot glue, but I don’t necessarily recommend that.
You have to be very careful not to melt your bottle and the edge doesn’t end up looking as neat.
If you’re adding the contrasting piece, sew them on with embroidery floss before sewing the two mitten pieces together.
Stitch two mittens together using a blanket or straight stitch. Repeat with the other set of mittens.
Curl the wire around a pencil, leaving about an inch at the end straight.
Squirt some hot glue into the bottom of the mitten and, working quickly,
slide the wire in between the two pieces of felt. If you’re me,
carefully pry the finger loose that you glued to the back of the mitten.
Fringe both short ends about 1” up on the 18” piece of flannel.
Tie it around the snowman’s neck, pushing the knot to one side.
Fold the 5” piece of flannel in half lengthwise.
Press. Fringe, clipping close to, but not through the fold.
Unfold. Roll up from one end, wrong side in.
Hot glue to the top of the bottle with the edge in the glue. After the glue is cool, fluff.
Glue a button or other embellishment onto the vest on the side opposite the scarf.
Let me apologize for his nose. I know, it’s cute. It’s a carrot button I’ve had for a thousand or so years.
I don’t know if you can still get them. A piece of orange felt cut into a carrot shape would be a good substitute.
You could even add a little black stitching. For his eyes, I used a Sharpie. You could also paint them on or glue on a little button.
When I made these the first time, I used fabric puffy paint. It gave them nice shine and dimension.
Somewhere in the years since I first made these, they changed the bottles from white to clear.
I hadn’t even realized it until I washed a bottle to make this one. I have an easy solution to that though.
Here’s the recipe for the drink mix I put in mine.
Cinnamon Vanilla Warmer Mix
3/4 cup white sugar
3/4 cup brown sugar
1 1/2 cup powdered vanilla flavored coffee creamer
1 1/2 cup dry milk
6 tablespoons cinnamon imperials (known as red hots around here)
Combine all ingredients in a large bowl. Add 3 tablespoons of mix to a mug of boiling water.
This recipe will fill the snowman with some left over. I will warn you, when you add it to the hot water,
it turns pink. Tasty, but definitely pink. The smaller snowman shown here is a stripped-down,
quick version, using a smaller creamer bottle. The buttons are glued on the front.
I now realize I forgot to fluff the pom-pom on the top of his hat. Don’t worry, I fixed it.
It seems fitting that this would be my last tutorial before Christmas.
This chilly guy and I have come a long way together.
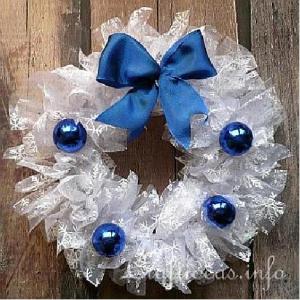
Christmas Craft – White Wreath With Blue Embellishments
This is a very easy wreath to make
and just requires a metal ring and
decorative printed organza fabric or
ribbon. Within an hour, your new
decoration will be complete and ready to hang up.
| For this project you will need: |
– metal wreath ring at least 6 inches in diameter – about 8.2 feet long and approximately 11.2 inches wide of printed organza material (with snowflakes for example) – glass Christmas balls in color of choice (here blue) – ribbon matching balls (here blue) – hot glue gun
| Instructions: |
1. Cut 1.5 x 5.5 inches strips of the organza fabric. Tie the strips all around the ring until it is completely covered.
2. Hot glue the ornaments and the bow to the ring.


Pingback: Set of 5 Table Decorations Snowman, Christmas, Holiday Table Runner 13×72 inches – 4 Placemats | ryanwithegroup
I did make my own glass Christmas tree & also a caulking tree that both looked great.